“It’s Coming..It’s Coming”

Snow days are interesting sociological events. There was a time when I found them relaxing and restorative. As a teen, I caught up on my homework and phone calls since it was before the days of cellular and you knew all of your friends were at home. As an adult, I felt snow signaled a break from the daily grind. It was time to put a stew on the stove, bake a pie, read a book or (if I was really ambitious)  clean out a closet. What better time to tackle a line on my New Year’s resolution list… In a perfect world!

In reality,  blizzards became big ratings for the media. Funny how more sophisticated and accurate forecasting led to more frequent and frenzied predictions of doom.  Weather worriers like me must tune in for the latest anxiety producing updates. Maybe living through Irene, Sandy and Nemo makes north easterners a little PSTD when it comes to storms. Or maybe the news just thrives on apocolyptic sounding forecast. For whatever reason, “preparedness” results in rushes on grocery stores for all those essentials of life like bread and milk:

bread and milk sandwich

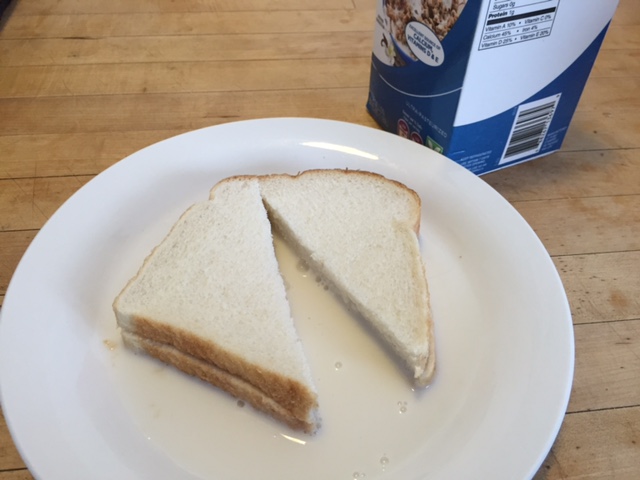
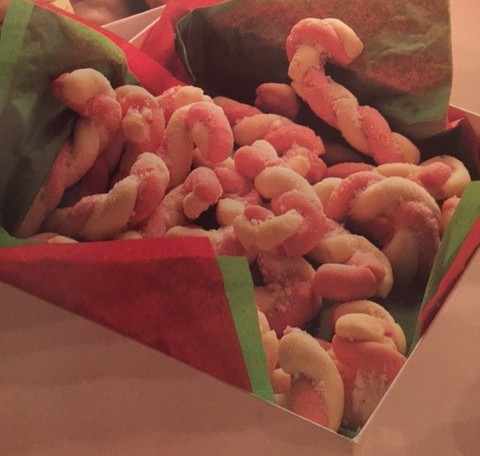
My only guess is to make the unofficial snow day bread and milk sandwich? I really don’t get it because no one ever mentions getting peanut butter for the bread. (Most likely because some viewers would be allergic to that.) Too bad because deli meat or cheese to put on the bread would be a bad idea in a power failure. The peanut butter wouldn’t spoil… but then there’s that milk in the refrigerator. It goes bad faster than just about anything else!

Seriously I’d rather not stock up on things I would otherwise never eat on an ordinary day. Without a stand by generator, I’ve also given up on visions of cooking comfort food from scratch while binge watching HBO series in the background. I’ve learned that a full fridge and freezer on the eve of a storm works like Murphy’s Law in my house. It will jinx the power into going out!

Having spent my college years on Long Island, I remember a storm that paralyzed the Long Island Expressway for days. People were pulled from their cars and brought to local fire departments. My dad had to spend the weekend in the Syosset fire house because there was no way to get home.  I saw this photo on Facebook of a traffic sign on The Northern State and just had to say: Godzilla is the best name for the next monster storm! The mania I saw on Friday afternoon in the Fairfield Connecticut Whole Foods was like a grade b movie.

Lizzard warning
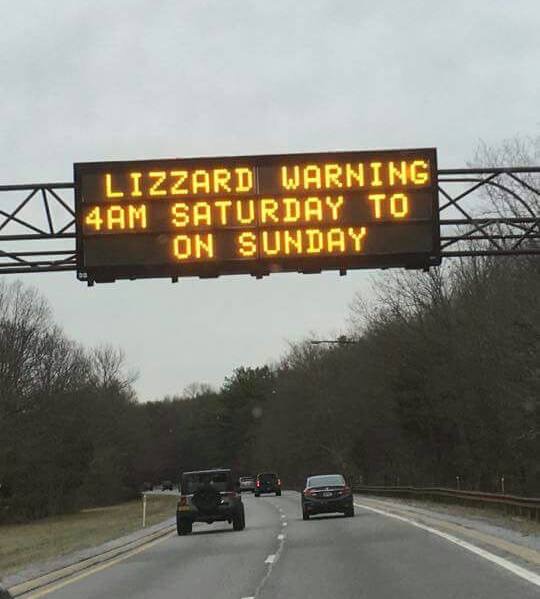
The truth is, no matter how much you try to prepare for a giant blizzard or lizard  strike you are going to be without something you need and will have wasted time and money buying things you don’t.
Godzilla2

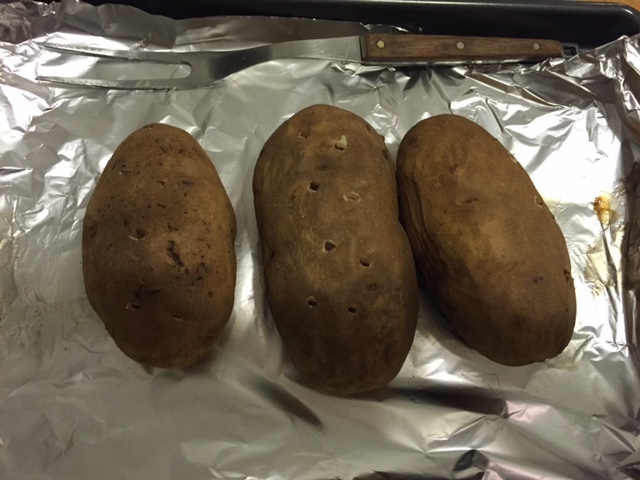
I have my flashlights, batteries, blankets, and enough previously forgotten food in the freezer to survive until the snow plow comes down the road and reunites me with the outside world.

As for Godzilla, we used to play his movies at junior high school Halloween  parties and found you can make the world right again by running the film backwards!Godzilla backwards

Baked Potatoes AuGratin– A New Year’s tradition

Certain Holiday rituals are simply timeless, like “Auld Lang Syne” playing when the ball drops in Times Square on New Years Eve. In our house, some kind of  au gratin or escalloped potatoes are as much a New Year’s tradition as that old Scottish tune imortalized by Guy Lombardo.

The dish is really very versatile as you can mix and mach the cheeses and toppings. The magic is in the “mornay” or cheese sauce you create by melting your favorite into a basic bechamel. One year I might use a sharp Wisconsin cheddar and the next a blend of Swiss and Gruyere. Even the topping is open for interpretation. The family heirloom recipe was made with dry buttered bread crumbs but we’ve also  tried using crushed potato chips or pretzels in the past. The outcome is always different but you rarely can go wrong.

The version I’m sharing today is what we just served for our New Year’s dinner. I made it with Vermont cheddar and chives and topped it off with panko bread crumbs. Unlike many recipes, this one begins with baked russets not raw sliced potatoes. It can be made a couple days in advance. Afterall, there are more festive places to be on  New Year’s Eve than stirring sauce on top of the stove.

(Note- this recipe is for 4-6 servings but can easily be doubled for a 3 qt casserole or two 1 1/2 qt casseroles.)

3 large russet potatoes

4 Tbs butter

1 clove crushed garlic

4 Tbs flour

1/2 tsp salt

2 1/4 cups warm whole milk

1 1/2  cups grated Vermont cheddar cheese

2 Tbs snipped chives

2 Tbs grated Parmesan cheese

1/2 cup panko bread crumbs mixed with 1 Tbs melted butter


Preaheat oven to 400° and place potatoes on a baking sheet. Bake for 1 hour and remove from oven. Pierce with a fork to let out steam and allow to cool to room temp.

baked potatoes

Meanwhile, make the sauce by melting butter in a medium saucepan and sauteing garlic. Blend in flour with a wire whisk then slowly blend in milk, stirring until thickened and smooth. Blend in 1 cup of cheese until melted and stir in chives.

cheese sauce

Carefully pull the skin off of potatoes that have puffed away and become loose but leave the skin that still clinging to the potato. Slice in thin slices and arange standing on side in a 1 1/2 qt buttered casserole dish.

sliced potatoes

Cover potatoes with sauce and sprinkle with remaining 1/ cup of cheddar cheese.Casserole with cheeseG_2845

Combine Parmesan with panko bread crumbs.

Panko crumbs

Spoon over casserole.

unbaked finished casserole

Cover and refrigerate until you are ready to bake. Preheat oven to 400°  and bake 45-55 minutes or until bubbling and golden brown on top. (If you are baking this right after assembling, reduce the cooking time by about 15 minutes.)

baked casserole

What’s On Your Christmas Cookie List?

meringue mushrooms

It’s that time of year when anyone under the age of six will be asked by every well-meaning adult they meet : “What do you want Santa to bring you this year? I remember those days and how the obligatory question was usually followed by little interest in the actual answer. It’s kind of like : “Hi, how are you?” with  the expected response being “Im fine”. No one really wants to know the details of how you are feeling that day in much the same way adults didn’t really want to hear a laundry list to Santa.

As a food writer, I frequently get a very similar question every holiday season. What are your favorite Christmas cookies? In the beginning,  I was taken off guard much the same way I felt when asked about my favorite song or movie. Hmmm… “I should know this, shouldn’t I?” and yet somehow I didn’t have a canned response prepared. About twenty minutes later, I usually had it figured out but the conversation had moved on to something else.

Well, I’ve had plenty of time to think about it this year. Favorite cookies aren’t just the ones you like to eat but the ones you like to bake. I’ll be brutally honest with you. I don’t have a lot of nostalgic memories surrounding rolling out massive quantities of sugar cookie or gingerbread dough. First with Mom, and later me, but it’s always the same mental image: An assembly line of baking sheets stacking up in a holding pattern the night before a big cookie exchange. The kitchen would be heating up and so would the dough that was sticking to the board, pastry cloth, marble or whatever we were using that year. Throughout the kitchen it was a winter wonderland of flour storms. There were hot spots in the oven and it always made me sad to rescue the santas and ginger men with burnt off or broken arms. I’d do my best to repair them with “first aide” frosting.  After an exhausting day of cookie baking, it was time to call for pizza.

There are some baking techniques that are just more pleasurable than others. My holiday stress busters are mushroom meringues or  candy cane cookies . There’s something about whipping up egg whites and turning them into toadstools with a pastry bag. It’s almost like witchcraft. The crispy, delicate mushrooms are the same that adorn a yule log cake. The candy cane cookies are easily modeled from ropes of dough; very therapeutic and entertaining for kids. It’s like working with Play Doh. I like to package the mushroom meringues in produce cartons as gift trays. The candy cane cookies make delicious tree ornaments. Christmas Eve is just one week off so there’s still time to have some fun in the kitchen and share it with friends!

Mushroom Meringue Cookies

4 large egg whites, room temperature

1/2 tsp cream of tartar

1/2 tsp cinnamon

1 cup of sugar

1-2 Tbs cocoa

12 oz package semisweet chocolate baking chips

1 Tbs butter flavored shortening

Preheat oven to 250°F

In a large mixing bowl, beat egg whites and cream of tartar with an electric mixer just until soft peaks barely start to form. Combine sugar and cinnamon. Gradually add one tablespoon at a time and continue beating until stiff, shiny BUT NOT DRY peaks form.

Line two large baking sheets with parchment paper. Spoon meringue into a very large pastry bag fitted with a large round writing tip. Pipe 40 mounds, 1 1/2″ in diameter for mushroom “caps” on one sheet. Flatten any points with the back of a spoon. On the second sheet, pipe 40 pointed mounds for mushroom “stems”.

Sift cocoa through a mesh sieve over the tops of caps and stems. Bake 30 minutes. Turn off heat and leave meringues in oven for 3 more hours. When cool and dry, carefully remove meringues from paper.

Melt chocolate with shortening in the top of a double boiler over barely simmering water. Stir until smooth. With a sharp pointed knife, carefully pierce a small hole in the bottom of each mushroom cap. Spread chocolate on to bottoms of caps and gently push a stem into the chocolate.  Makes between 36 to 42 cookies.

Candy Cane Cookies

1/2 cup (1 stick) softened butter

1/2 cup shortening

1 cup powdered sugar

1 egg

1 1/2 tsp almond extract

1 tsp vanilla extract

2 1/2 cups all purpose flour

1/2 tsp salt

1/2 tsp red food color

1/2 cup granulated sugar

1/2 cup crushed red and white peppermint candy or candy canes


Preheat oven to 375°F
Line a large baking sheet with baking parchment paper. Cream butter, sugar and powdered sugar. Blend in egg, almond and vanilla extracts,flour and salt. Divide dough in half and tint one part with red food coloring. For each cookie, shape one heaping teaspoon  each of red  dough and plain dough into 4″ropes. Twist together like a candy cane and place on sheet. when all cookies have been shaped bake about 9 minutes until set but only very lightly browned. While cookies are baking, combine sugar and crushed candy. Immediately sprinkle candy mixture on hot cookies as soon as they come out of the oven. Gently remove cookies with a spatuala after cooling. Makes about 4 dozen
Candy Cane cookies


Time for Turkey Rolls

3 baked turkeys

No I’m not talking about a deli sandwich wrap but warm cinnamon rolls to share in the morning while preparing Turkey Day dinner.

To be honest, I enjoy baking for Thanksgiving more than I do for Christmas. I’m not exactly sure why but perhaps it’s because I have just a little more time on my hands than when the holiday crunch sets in. I can promise you one thing, these turkey rolls are about as easy as it gets without buying something from the bakery.

pumpkin roll can

And this is what I mean by easy— I buy cans of seasonal cinnamon roll dough from Stop & Shop  that has pumpkin icing. If you can’t find these in your local store, don’t worry. You can get the same result by blending in some pumpkin butter (similar to apple butter) into the provided frosting.  If you can’t find that you can use apple butter.

Next unroll three rolls for the body and neck of the turkey and use the remaining two rolls to cut into tail feathers. Arrange on parchment paper to look like this:single dough turkeyjpg

Bake in a preheated 375° oven for about 10 minutes or until lightly brown. Don’t overbake or they will be dry. While warm, spread with icing and decorate the faces with raisins and cranberries.three iced turkeys


Now gobble gobble!


Frozen Jack O’Lanterns

ice cream pumpkins

This simple Halloween treat gives a whole new meaning to “frost on the pumpkin”. The idea came to me when I was writing The Children’s Party Handbank. As a kid, I used to carve oranges like Halloween pumpkins long before the holiday showed up on the calendar. It was a more important party to me than my birthday. I guess I was just ahead of my time to start thinking about Halloween in August! These days I see costume pop up stores long before school starts.

So all you really need for this devilish dessert is a good paring knife, a grapefruit spoon, large oranges, whole cinnamon sticks and chocolate ice cream or gelato. Figure on using about 4oz of ice cream per orange and calculate the amount you’ll need from there. A pint will fill about for or five oranges (enough for the family) but you’ll want a half gallon  to a gallon for a bigger soiree .

Slice the tops off of oranges and completely scoop out the fruit with the graperuit spoon. (Note: I save the orange leftovers for fruit compotes, if using seedless oranges.) Carve simple Jack O’Lantern faces into each orange shell. Cut a hole in the top of lids. Working quickly, fill pumpkins with ice cream and top with lids. Insert cinnamon sticks through lids. Wrap individual oranges in plastic wrap and freeze until right before serving.

ice cream pumpkin drawing

After School Apple Cakes

As fall aproaches, I like to pull out this recipe from my 2006 CT Post column for caramel apple cakes. I like making the small batch recipe but you can always double it for a bake sale.Apple cake column

It’s that time of year again when you’re shuttling a bunch of kids around  to all of those non-stop after school activities. In my day, that meant Mom would pick up a car pool of kids, pile them in the back of our station wagon then pick up two-dozen hot glazed donuts from Lucy Lynn Bakery and deliver her cargo to the Girl Scout meeting. These days, many schools are encouraging parents to steer clear of greasy, hydrogenated junk food as in-school treats, favoring fresh fruits, yogurt and healthy snacks. I applaud these efforts. However, when 3:00 PM hits so does hunger and sometimes a box of trail mix just won’t do the trick. When the natives are restless you want to keep them happy! You could drive them through MacDonalds or your could consider the retro concept of home made cupcakes. You control the ingredients and your kids learn to bake something new. In September, I look to the classic apple theme for inspiration. What could be a better back to school tradition than caramel apples on a stick? (The cinnamon candy kind always got stuck on everyone’s braces.) These easy to mix cupcakes are topped with melted caramels, garnished with chopped walnuts and have sticks in the center, just like old fashioned caramel apples.

(MAKES ABOUT 1 DOZEN) CUPCAKES:

1 2/3 cups all purpose flour

1 cup firmly packed light brown sugar

1 tsp cinnamon

1 tsp allspice

1 tsp baking soda

1/2 tsp salt

3/4 cup applesauce

1/4 cup sour cream

1 Tbs lemon juice

1/3 cup vegetable oil

1 egg

1 tsp vanilla extract

1, 14 oz bag of caramels, wrappers removed

2 Tbs milk

1/2 cup toasted, chopped walnuts

12 popsicle sticks

Preheat oven to 350 degrees. Combine flour, brown sugar, cinnamon, allspice, baking soda and salt in mixing bowl. In separate bowl blend together applesauce, sour cream, oil, lemon juice, egg and vanilla. Mix into dry ingredients. Pour batter into paper lined muffin tins and bake 20 to 25 minutes. Cool on wire rack. Melt caramels milk in a double boiler, stirring until smooth (start . Spread caramel on the tops of cupcakes.Apple cake column

Sprinkle chopped walnuts around the edge of cakes and insert a popsicle stick in the center of each.

Apple cake columnNote: you may have to bake a square 9” x 9” cake 30 to 35 minutes.


Handle With Corn

With Labor Day rapidly approaching it’s time for summer’s last hurrah. This year you wouldn’t know it with a 90°+ heatwave but that’s all the more reason to celebrate with warm weather favorites like corn on the cob. My favorite way to do this is to shuck the ears and leave the stems on giving your guests a handy handle.

corn on foil

herb butter

Next I cream together some softened, unsalted butter and add some seasoned salt and herb mixture. (Here I’ve used Bousari, but you can come up with your on combination of herbs and spices using whatever you have in your pantry). Wrap corn in squares of foil.

folding foil around ear

1 ear covered in foil

ready to bake

Now you can just cook these on the grill for about 25-30 minutes. Too much meat taking up grill space? These work just as well baking in the oven at 375° for have an hour for the roasted corn effect. These are hot when they are ready so let rest a few minutes before serving.

“Still Crazy After All These Years” — Crew Cut Coconuts


old coconuts

It’s been nine summers ago since I first came up with the idea of using coconut heads in my Connecticut Post kid’s column. This morning, I decided to check in on my now retired little friends and see how are were doing. Considering that they owe their personality to a hot glue gun, they’ve held up pretty well in a sweltering attic visited by squirrels!

Funny thing about the coconut heads, they’ve always seemed (to me) to have a sort of “Muppetesque” quality:

Unknown

Hmmm…What do you think?

Well, maybe next summer I’ll sew up some bodies for them and turn them into puppets that sing “I’ve got a lovely bunch of coconuts”. In the meantime, I’m going to start growing some grass toupees! You can read the how -tos in the transcript from the publication below:

8 August coconuts 2 copy 2

Top off Summer Vacation Making these Wacky Planters

Sometimes kids like to putter alongside parents when it comes to gardening or using tools in the workshop. With adult supervision, it provides an opportunity to learn new skills and develop hobbies that will carry into adulthood. I always used to watch dad with total fascination as he made something out of nothing with a few of his gadgets on the basement workbench.” I wanna hold the drill!” was OK— “I wanna hold the blow torch!” was NOT OK. This is one of those family bonding projects that requires some initial parental involvement but results in months of summer fun. Together you can transform coconuts into cartoon-like characters. Kids water and nurture the crop of grass that grows from their heads. Best of all it teaches maintenance and responsibility. Without weekly hair cuts with some kitchen shears, their “flat tops” will turn into Rapunzel’s long locks.

FOR EACH PLANTER: one coconut marking pen cross cut saw vise knife drill with half inch bit whole, unshelled almond 3 Brazil nuts 1/2” to 3/4 “ hobby eyes glue gun potting soil rye grass seed. Mark off the upper third of the coconut with a pen. Drill a hole or two in the bottom of the coconut for drainage. Anchor the coconut in a vise and saw along the line. Allow cut coconuts to dry out for several days so that the white coconut meat begins to pull away from the hard outer shell. Cut cube-like scores into coconut meat and pry out of shell with a knife. Use glue gun to attach an almond in the center of each for a nose. Glue on a Brazil nut as a mouth underneath the nose and on each side of the “coconut head” as an ear. Glue on hobby eyes. Fill coconut with potting soil and moisten with water. Cover coconuts with a thick layer of grass seed and water daily, checking to be sure the soil is moist at all times. Keep in a sunny place and grass should begin to germinate in 3 to five days. Note: Grass seed may be started outside of the coconut heads in clear plastic , disposable drinking cups. Once the grass has begun to grow in can be transplanted. This has the educational advantage of watching the root system develop before your eyes.8 August coconuts 2 copy 2

How to Make a Three Cornered Hat Cake for the Fourth

3 corner hart annd red shoes

Guess who? That’s six year-old me visiting Colonial Williamsburg for the very first time. I will never forget that Independence Day when my parents drove us halfway across the country to give kids from Kansas City the experience of being in one of the original thirteen colonies. Now that I’ve become a Connecticut Yankee, being surrounded by remnants of the Revolutionary War doesn’t seem quite as exotic as it once did.  That’s not to say I feel jaded by the antiquity. I’ve grown to love this holiday more than any other and feel privileged to watch fireworks from my street which was once an 18th century gun battery. As I see the rockets launched from a barge on the Long Island Sound, I think of how they dug up cannonballs when they built this house. Little did I know that  summer when I became infatuated with my three cornered hat that I would someday live where all the action took place. HAPPY BIRTHDAY AMERICA!Williamsburg under Horse head

 Hat’s off to this Patriotic Dessert

(transcript from The Connecticut Post)

When I was in first grade, my parent’s decided that we should spend July 4th in the tradition of our founding fathers. Mom and Dad packed up our station wagon and drove off on a pilgrimage from Kansas City to Williamsburg and Jamestown, Va. After three days of “Are we there yet?” and many pit stops, we arrived in the magical land of three cornered hats. At least, that’s how I saw it… Oh there were lots of neat carriages, cannons and drums but I was most intrigued with the black, felt “tricorne” worn by everyone from the docents at Governor’s Palace to the proprietors of the gingerbread bakery. Once inside the souvenir “shoppe”, the salesperson in an eighteenth century costume tried to convince Mom to buy a lacy Martha Washington bonnet for me… No way!!! There wasn’t a single kid running around the streets of Williamsburg in one of those. Like all the other girls in the store, I picked out the hat with gold braid trimming the edge. It became inseparable from my head for the rest of the summer. I wore it in restaurants, at church– even to the swimming pool (much to the chagrin of my parents) Before the first day of school, my hat mysteriously disappeared. It was nowhere to be found in the house? For most people, fireworks are synonymous with July 4th. For me, I will always associate the the holiday with that wonderful trip to Williamsburg and my three cornered hat. It’s easy to make one out of chocolate brownie cake for a unique patriotic dessert. In keeping with the Yankee Doodle tradition of our state song, ad a feather for a colorful effect.

three corner hat cake column July copy

THREE CORNERED HAT CAKE

10.25 oz brownie mix

baking parchment chocolate covered donut

toothpicks

16 oz can of dark chocolate frosting

gold craft cord (a least 1 yard)

red , white and blue craft feathers

strawberries and blueberries for garnish whipped cream or whipped topping and pastry bag fitted with a rosette tip

Line a 9” cake pan with a circle of baking parchment. Prepare mix according to directions and spread into pan*. Bake at 350 degrees for 25 to 28 minutes. Cool and chill in refrigerator (or stick in the freezer ) before cutting, Cut a triangular shape from the circle, saving the three sliced edges. Trim about another half inch of brownie off of each side of the triangular piece. Stand the curved brownie slices along the smooth edges of the triangular piece and secure with toothpicks. Since brownies are very pliable, you can pinch the edges together to form points at the corners. Place the donut in the center as the crown of the hat. Fill the center of the donut whole with a scrap of from the brownie trimmings. Frost the cake with chocolate frosting. Gently press gold craft cord around the edge of the hat against the frosting and trim at joining corner. If feathers are long, cut about 3” down from the tip and stick in the corner of one side of the hat. This cake can be presented on a platter decorated with fresh blueberries, strawberries and rosettes of whipped cream for a red white and blue finale.

*Note, if using a 1 lb 3.9 oz family size brownie mix, you can make two cakes by simply adding another donut and can of frosting.

Hey Kids — How to Give Dad the Same Tie you Gave him Last Year!


Father’s Day is almost upon us and I can remember how challenging it was to think of something to give my father that he didn’t already have— especially if I had already given it to him before! This idea comes from my Connecticut Post column archives. It puts all those old neckties to good use by recycling them into cedar stuffed snakes to hang in his closet . (I’ve provided the transcript below for easier reading.)


6 June:tiesnakes copy 3


I’ll never forget the Father’s Day when everyone gave Granddad a tie. We should have coordinated our gifts a little better but I guess no one in my family was using their imagination that year. Box after box, the disappointment grew on my grandfather’s face (even Dad got a can of English toffee). Finally, I handed Granddad my package. My careful attention to wrapping it with perfectly coordinated paper and ribbon could not disguise the tell tale long, flat box. He joked: “If I get one more tie, I’m going to have to hang someone with it!” Of course, Granddad wasn’t trying to be ungrateful but the message was received loud and clear. Around our house, ties became a taboo gift for Father’s Day. Whether or not the men in your family have the same attitude about receiving neckties, you probably have a surplus from years past. Why not recycle, putting them to work repelling moths? Wide or narrow ties work equally well for stuffing with the same cedar shavings used to line the hamster’s cage. Dads (even granddads) will enjoy seeing these silly snakes, draped around hangers, every morning they open the closet door.

NECKTIE SILLY SNAKES

2 old neckties (stain free)

scraps of red felt and felt to coordinate with ties

Bag of cedar shavings for hamster cages

4, 1/2 moveable plastic hobby eyes (sew on type)*

4 small black shoe buttons needle, thread and scissors

Cut two strips from red felt 3/4” wide and 6” long. Make “V” shaped notches at the end of each to resemble snake tongues. Cut diamond shaped pieces out of coordinating felt to cover large and small end openings of ties. Stitch tongues to the underside of large open ends. Slipstitch large diamonds over large ends and tongues. Slipstitch small diamonds over small ends. At both ends of a necktie, seams are left open about 6 “ from each end. Use the openings to stuff with cedar shavings. (Tip: It’s easier to push shavings down into ties by using the eraser end of a pencil. If ties are too narrow, open them up with a seam ripper, spoon shavings down the center and slipstich the seam back together.) Do not stuff ties so tight that they cannot bend. Slipstitch openings. Sew eyes and shoe buttons (for nostrils) on top side of large ends. *Note: If you can’t find sew on hobby eyes, substitute with the glue-on type and use thick craft glue.

Here you can see some neck tie snakes straight out of my second book : What Should I Bring? Great Gifts for Every Occaision. In this photo, they’ve been paired with a frog prince pillow. I’m not sure I’d suggest kids make one of those for dad, afterall he’s “King”…at least on his day!

FullSizeRender